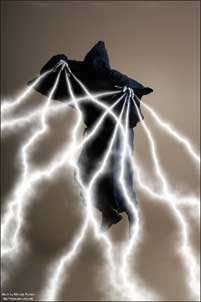
 We are on the 2nd tutorial. Here we’re gonna play with Ps and make thunder blasts out from hands. This is the source file:
• Boo (.jpg format)
Download and open it on Ps. Make a new layer above the ‘Background’ layer; press Ctrl+Shift+N, and we name it ‘Layer 1’ so you will type nothing on displayed dialog box.
 Press G or Shift+G to activate Gradient Tool or you can choose it from the toolbox on the left.
 Set the foreground and background colors to be default (press D), or you can click once on the double square in the middle of red circle. The results are foreground color become black and vice versa; the background color become white.
Look on the property bar above your screen, it is the Gradient tool property. Make sure ‘Mode’ is Normal (blue circle), and gradient style is Angle Gradient (red circle). Then click on Gradient Editor (green circle).

Here is the Gradient Editor; make sure the red circle one is active on the ‘Presets’; just click on it.
Look to the gradient bar; there are squares below and above. Click to one below, we start it from the left one.
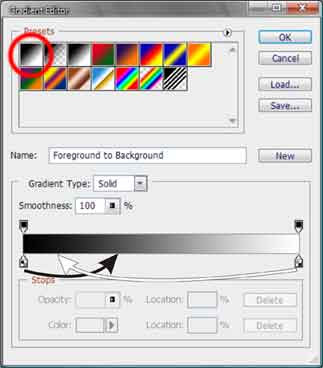
Press Alt on keyboard then drag the left square to the right; follow the black arrow in the picture.
Press Alt on keyboard then drag the right square to the left; follow the white arrow in the picture.
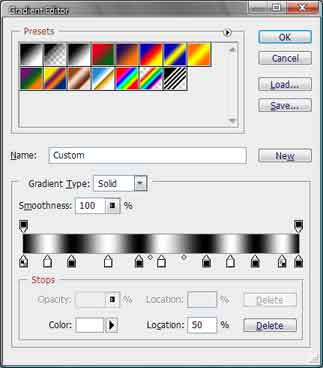
Repeat two steps before until your gradient bar match the picture below. Click ‘OK’.
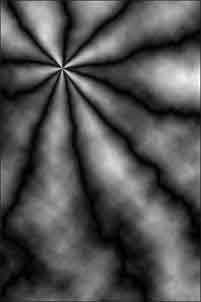
With Layer 1 is activated, drag the pointer start from one of his hand on arbitrary direction. It should be looked like this.
Go to menu and open Filter – Render, click on ‘Difference Clouds’. Now our picture is looked like below.
Press Ctrl+I to invert the color.
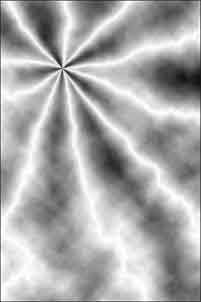
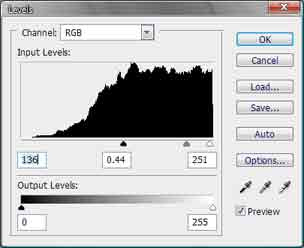
Then press Ctrl+L to activate ‘Levels’ dialog box. Adjust the three sliders on ‘Input Levels’. Feel free to experiment with the values. Click ‘OK’. What you see is lightning everywhere!
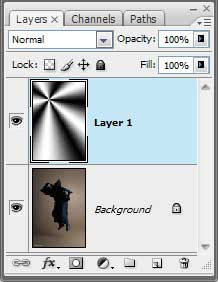
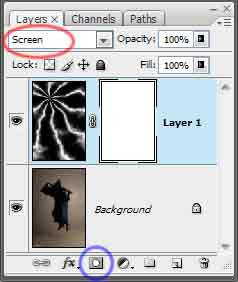
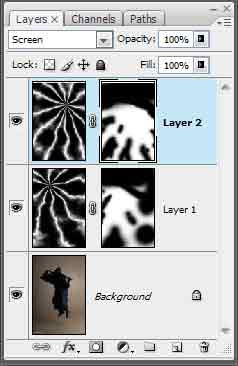
Look at to Layers Palette on the right-below of your screen or press F7 repeatedly if you don’t see it :)
Change the blending mode to ‘Screen’ (red circle), and click on button in the blue circle to make a new layer mask.
Repeat those steps on a new layer so you will see your picture like this.
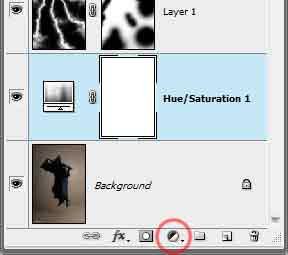
Everything is looking good now, but you can add some more magic. Let’s change the background color; click on layer named ‘Background’, which is our original layer before. Then click Adjustment Layer button (red circle) and choose ‘Hue/Saturation’.
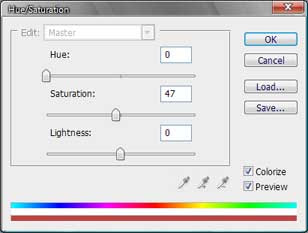
Fill the check box of ‘Colorize’, adjust the Hue and Saturation sliders to something like in the picture, feel free to experiment with the Hue slider. Click ‘OK’.
Done! Here is the result. Click here to open full size result file.
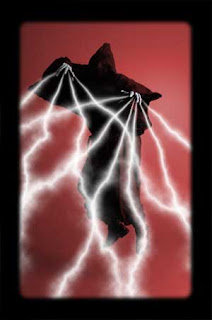
Note: Original source file by Marcus J. Ranum
Download and open it on Ps. Make a new layer above the ‘Background’ layer; press Ctrl+Shift+N, and we name it ‘Layer 1’ so you will type nothing on displayed dialog box.
 Press G or Shift+G to activate Gradient Tool or you can choose it from the toolbox on the left.
 Set the foreground and background colors to be default (press D), or you can click once on the double square in the middle of red circle. The results are foreground color become black and vice versa; the background color become white.
Look on the property bar above your screen, it is the Gradient tool property. Make sure ‘Mode’ is Normal (blue circle), and gradient style is Angle Gradient (red circle). Then click on Gradient Editor (green circle).

Here is the Gradient Editor; make sure the red circle one is active on the ‘Presets’; just click on it.
Look to the gradient bar; there are squares below and above. Click to one below, we start it from the left one.

Press Alt on keyboard then drag the left square to the right; follow the black arrow in the picture.
Press Alt on keyboard then drag the right square to the left; follow the white arrow in the picture.
Repeat two steps before until your gradient bar match the picture below. Click ‘OK’.

With Layer 1 is activated, drag the pointer start from one of his hand on arbitrary direction. It should be looked like this.

Go to menu and open Filter – Render, click on ‘Difference Clouds’. Now our picture is looked like below.

Press Ctrl+I to invert the color.

Then press Ctrl+L to activate ‘Levels’ dialog box. Adjust the three sliders on ‘Input Levels’. Feel free to experiment with the values. Click ‘OK’. What you see is lightning everywhere!

Look at to Layers Palette on the right-below of your screen or press F7 repeatedly if you don’t see it :)
Change the blending mode to ‘Screen’ (red circle), and click on button in the blue circle to make a new layer mask.

Repeat those steps on a new layer so you will see your picture like this.


Everything is looking good now, but you can add some more magic. Let’s change the background color; click on layer named ‘Background’, which is our original layer before. Then click Adjustment Layer button (red circle) and choose ‘Hue/Saturation’.

Fill the check box of ‘Colorize’, adjust the Hue and Saturation sliders to something like in the picture, feel free to experiment with the Hue slider. Click ‘OK’.

Done! Here is the result. Click here to open full size result file.
Note: Original source file by Marcus J. Ranum


hi there...
thnx udah ngintip yupp...
mo komen di blog satunya... susah musti log in... heheheheh...
maap gk sempet, jadi komen di sini aja deyh walaupun beda domain.... di sini ttg tutorial soosop... keyeeennn....
salam dari Jakarta bang... horas...
wewww baru nyadar nih gw.... Ride The Lightning... fight fire with fire... (maap jd nyampah gini :P)
woww keren bgt bang stlh di liad2... itu petirnya gmn klu gerak2 jd gif? heheheehh.... pke image ready bsa gk?
thanx atas komen en pujian nya.. :)
tuh judul emang terinspirasi dari sebuah lagu favorite: Metallica!
idenya boleh juga tuh bung TV.. ntar ktia bikin petir nya gerak2 pake imageready.. tp kayak nya ukuran file bakal besar ya.. ;)
wes ... mantap juga nie tutornya ???
tetap sukses, truz nambah lagi ya photoshop tips & trick nya ???
Thanks for sharing this nice tutorial!!
Color Experts
Clipping Path